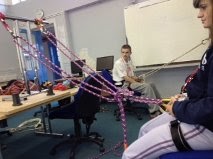
The belayer should keep the rope locked off in the belay device whenever the climber is not moving. As the climber moves on the climb, the belayer must make sure that the climber has the right amount of rope by paying out or pulling in excess rope. If the climber falls, then they will free-fall the distance of the slack or unprotected rope before friction applied by the belayer will start to slow their descent. Too much slack on the rope will increase the distance which may be fallen, but too little slack on the rope may prevent the climber from being able to continue to move up the rock. It is extremely important for the belayer to concentrate on the climber's situation, as their role is crucial for the climber's safety.
Tuesday, 29 May 2012
The correct technique for belaying
In rock climbing, belaying is a technique used to control the rope so that a falling climber will not fall very far and will be caught by the rope. The belayer is the person in control of the ropes as the climber is climbing up the wall or rock. The belayer passes the rope through a belay device, which allows the rope to flow freely while the climber is climbing. In the event of a fall, the belay device will lock off the rope to stop the fall. If a climber were to fall, the belayer would be able to hold the entire weight of the climber and to help lower them to an area where they may continue climbing.
Correctly fitting a helmet
The correct technique to put a helmet on is that firstly you must put it on your head with the lowest bit and the tightening device at the back of your head and you must tighten your healmet so that it wont fall off and then you must clip the straps together underneath your chin so it is snug enough for a strong hold, without being too tight. Make sure the straps aren’t slack. If this is done properly then it will not fall off your head and provide maximum protection.
Mountain Biking.
We had to plane a route for mountain biking using a map of the area that we were going to use, this was called Howden Reservoir.
We had to put crosses where we would want to stop for a rest and we had to describe what we would be able to see around us when we would stop .When we wa planning the route we used grid reference to found out were a place would be The trip around the lake was approximately 14km. the route we were taking was over different terrains, gradients and safetys. For some of the journey we were on roads so we look out for cars that were coming and make sure that we were all safe.
We had to measure the distance around the lake which was about 14km. We did this becuase each box on the map was 1km, so we measure the distanced by using the boxes, we could have an approximate distance set out of each leg of our journey were like 2 - 3 km each. We guessed that it would take an hour and half to get all way round, but when we actually took part in the ride it took us 1 hour and 45 minutes, this was becuase some of us was slower then others so people who were at the frount had to wait for the people who were at the back, but everyone helpped each other out. Some of the journey was hard and at one point i had to get of and push the bike up a hill but it was fun to take part in beucase we all did it together and i would do it again. When we stopped at one of the points we all needed a drink becuase it was really warm so some of us drunk out of the river, so next time i will make sure i take some water.
Aiming off and hand rail features
Aiming off and using hand rail features and features to relocate all involve using the landmarks of a location to help you along a route. Aiming off and using hand rail features both involve using land marks to help find and locate where you need to go and to help you stay en route, using features to relocate is something you do when you need to go back and find your position.
Wednesday, 23 May 2012
Correctly Fitting Harness
When you are putting a harness on you need to make sure that it fits right becuase with any piece of gear or clothing that you wear for example, shoes, clothes, packs, or even bikes. They will never be truly comfortable unless they fit.
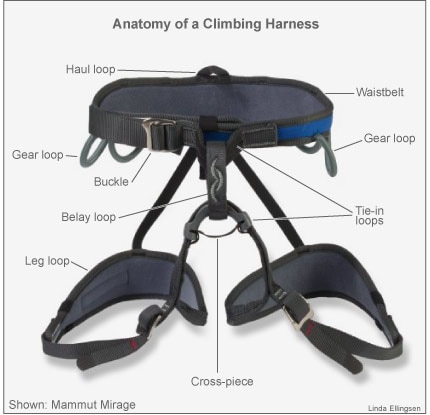
Waistbelt: The waistbelt should settle just above your hipbones and should not be able to be pulled down over your hips.Make sure your waistband isn’t restricting your breathing.
Leg Loops:-The loops should compromise between not being able to slide around, without hindering your movement.Gear loops are there to clip your karabiners or protection equipment to.
Parts of a Climbing Harness
If you’re new to climbing, your first step is to understand the parts of a harness.- Waistbelt .This is the main belt on the harness. Various designs and materials are used to achieve the maximum amount of comfort with the minimum amount of weight. One or 2 automatic or manual double–back buckles help to adjust the belt.
- Buckles: These consist of 1 or 2 pieces of metal to allow for manual double–back or automatic double–back respectively. The buckle is usually a bit off–center to avoid conflict with rope tie–in. A harness must have a buckle for the waistbelt but does not necessarily need buckles on the leg loops.
Leg Loops:-The loops should compromise between not being able to slide around, without hindering your movement.Gear loops are there to clip your karabiners or protection equipment to.
Specific climbing moves;
Mantel Shelf - This is were a climber is trying to get onto a ledge at about their chest height, they will put both their hands onto the ledge and pull the ledge so that their body is moving up, then about half way up their body he will start to push down on the ledge until he can get their leg onto the ledge then with that leg they will put all their weight on it and push themself all the way up. This move is usually performed when good handholds above the ledge either do not exist or are not reachable.
To perform the layback and the mantel shelf you need to use both your hands and feet to climb but the lay back is better used when attempting to climb a corner or a crack in a rock face and the mantel shelf is better for climbing up onto ledges and over rock faces.
When i tried both of these techniques i found the layback difficult becuase it put alot of strain onto my body especially my arms. so this wouldnt be very good if i was planning a long climb. Were as the mantel shelf just felt natural becuase it is the same technique as getting out a swimming pool. When doing this climb you have to make sure you bring your foot up and place in on the top of the ledge rather then your knees.
This is me doing the mantel shelf .
Layback - This is were the climber tries to get up the rock face by pulling with their hands and pushing with his legs. In a part of the climb where there is just a crank you must put your hands in the crack or hold onto a rock then push up with your feet while pulling up with your hands. This is unlike crimping and pinching becuase you have to use your hands and feet in layback where as in crimping and pinching you just use the strengh in your hands.
Crimp -A crimp is a small handhold that a rock climber utilizes by using their fingertips on an edge, a narrow ledge of rock that ranges from the width of a dime to about an inch. Crimp holds are not used often because they are very strenuous and it's easy to injure and stress fingers. Sometimes the thumb is wrapped around the index finger on a crimp hold to give more pulling power.
Pinch - This is a hold where you must pinch using your thumb and fingers to hold on
Hand and Foot Jam's - you must jam your feet and hands into a crack in the wall to hold you up and also to help you climb the wall.
Crimping and Piniching are a like becuase they both are using the strengh of your hands and when i did this i find it hard becuase i havent got that much strengh in my arms so i have to use my legs to give me more support.
The route which you choose to climb on the rock face is crucial, because you want to climb to your ablity and experiance. Also some people are more comfident then other. Some parts are too dangerous for a beginner to or even for the most experienced climber it can be dangerous.
Communication between the belayer and the cimber is really important becuase the climber is in the hand of the belayers. If the belayer isnt watching the climber and they are not listening, the climber could be put in a dangures passions. For example oif the climber is shouting down to the belayer about the rope being slack and the belayer is not taking any notice the climber could falls to the floor or even so far that when they stops they will fly into the wall and really hurt them selfs or even worse kill them selfs.
Figure of 8
The figure of eight knot is used when you are climbing or abseling. It is when you are fixing your self to the ropes. There are two main reasons why the figure of 8 is used and this first one is that is is impossible to come loose if tied properly and that it can carry the climbers weight and the second resaon is that it can easily be untied by the person at the top once the climber is safe.
Wednesday, 8 February 2012
Cooking out doors :) (well trying to)
On the 1st of February we went outdoors for one of are activitys and learnt how to cook. There was four of us in our group and they were, Me, Amie Bilby, Lauren Barella, Dan Haythorne. We were making Pasta n sauce, potatos and chocolate pudding for desert. Our method of cooking was using Tranjia which is a small cooking appliance run by mentholated spirits which is a purple liquid which has a blue flame when dark; usually you can really see it in daylight.It contains a stand which connects to another circular metal object which spins onto the stand. This holds either 1 of the 2 pans or a frying pan. It also has a lid which can cover the food while it’s cooking. It’s a quick why of boiling liquid seen as though it only takes about 5-10minutes.The new potatos were simple to cook because they only took about 10-15 minutes and the pasta and sauce as smiple as well becuasue all we had to do was boli in it the water and we added abit of butter to make the sauce thicker.The food was cooked well and didnt take to long to cook but we did end up with some problems. This problems was with the boil in the tin chocolate pudding. The first problem was that we forgot to put holes in the top of the tin, so if it was left in the boling water any longer the tin would have exploed. The second problem was that the tin opener we had wasnt really any good so we couldnt get into the tin, so dan had to try get it open the old fashion way be smashing the pudding on the rocks, which didnt really work. In the end we gave up on tryin to open the pudding and just used the water to make a hot chocolate with becuase everyone started to get cold and needed warming up. Compared to the other groups we took the easier approach becuase all we had to do was boil are food. One of the other groups made a stir fry witch was also simple but smelt really nice. This group had best nutritional value and ours seemed to be full of Carbrohydrates. To improve are cooking experience next time, we need a better tin opener which would allow us to have the chocolate pudding which is high in sugars for quick releasing energy.
Subscribe to:
Posts (Atom)